


One of the fundamental aspects of animation is locomotion. One may want to create epic battles, dramatic moments, or funny jokes, but the key to all (except the latter, characters zipping around can be quite humorous) is getting characters from A to B. An awesome fighter can hardly defeat a fearsome foe if they can’t get close, and what couple has big arguments while standing stock-still? Inevitably, one must animate characters walking or running. In this article, I will show you how to do so.
It’s hard to animate without a medium, however. For examples in this article, I will be using an app called Stick Nodes, which is free to download on Android and iOS devices. Principles discussed should apply to any animation method, however, so whether you’re more traditionally talented or a three-dimensional thinker, this article should be of some use.
Let’s begin with the fundamentals of a run cycle. There are five essential poses within one: Contact, when the character’s foot hits the ground; down, the lowest point in the cycle where the downward momentum is carried through; passing, where the legs cross; up, where the character kicks off the ground; and air, where the character is momentarily sprung off the ground.
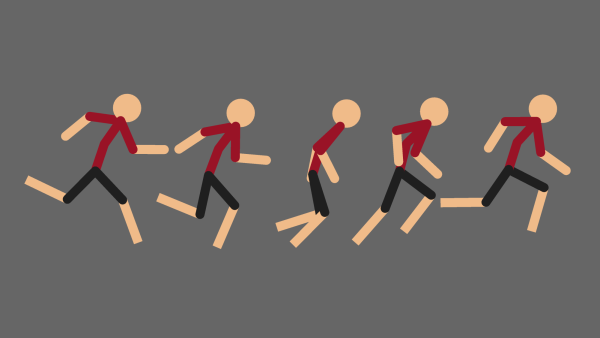
For this tutorial, these five poses are all we need to animate a complete run cycle, but, depending on a variety of factors (such as the weightiness of the character, frame rate, etc.), one might add or omit a pose.
The step-by-step process is simple: Open the app and select your FPS. I prefer 15, though many use 12 and 24. I recommend making a movie clip of the animation, as running and walking animations are commonly reused. Then, lay out your poses by adding five frames. Adjust the limbs, using reference as necessary. Lift the character up and down as they enter the different positions, air or up usually being the highest point, and down being the lowest. Bend and drag the arms as they swing, maintaining the characters’ balance. The arm opposite the leg should be in front; if the right leg is making contact, the left arm should be in front of the body. Bob the head a little as they go up and down. Be sure to copy the starting frame to the end to verify the cycle loops smoothly.
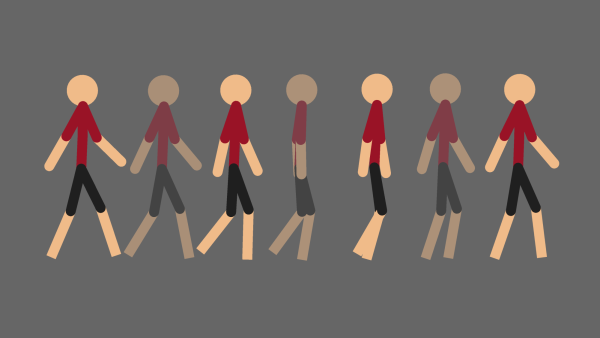
The result should look something like this:
A key area to pay attention to when making a run or walk cycle is the placement of the feet. Spacing them evenly can help make moving the cycle at a constant rate appear more natural and avoid sliding.
Now for the walk cycle. Although it might seem simpler, walk cycles can require more frames and closer attention to timing than a run cycle might. The same principle is there, with the four key poses being contact, down, passing, and up. Frames in between these poses make the pace feel more like a walk than a jog or speedwalk.
The movement of the body is going to be far more subtle than the run cycle. The height difference between the poses should be slight; the character should maintain a similar profile throughout. The placement of the feet becomes far more crucial in the case of the walk cycle, as one foot is always on the ground, ensuring even spacing and avoiding sliding becomes of utmost importance. But it’s not all legs in a walk cycle; the arms are often just as important. They swing back and forth to maintain the character’s balance, and in my opinion, truly sell the animation. While characterization and acting are not the focus of this article, one could easily say the arms communicate much of the character’s personality within a walk cycle. We can just make sure they swing in time with the legs in our case, however.
Feel free to fiddle with the feet placement, the swing of the arms, etc., until you’re satisfied with the motion. Once one has mastered the fundamentals of the walk and run cycle, the room for acting/characterization is immense. Try different key poses. Use more or fewer poses. Add a secondary action, like a cape or a coffee. By now, the first steps to wider animation have already been taken, and the bigger fight, verbal or physical, is waiting to be had.